| Posted By |
Discussion Topic:
Baffling Brake Light Issue - Driver's Side
-- page:
1
2
3
|


|
 len47merc
 |
 06-23-2016 @ 6:46 AM
|
|
|
|
Senior
Posts: 1165
Joined: Oct 2013
|
The answers to my last two questions are: YES & YES. Out to the garage this morning - no driver's side brake light, all other lights working. Remove the lens, remove the bulb, put the bulb back in - brake light magically working (for how long it's anybody's guess now).
Working on your terminal strength test next Tom. Going to go ahead and re-solder all connections while I have it out. Update later. I had my doubts on the insulation because there was no logical reasoning other than Alan's last response that made any sense and even then I can find no difference with my highly calibrated and sensitive hands in finger-pressure spring strength between the two terminals.
The simplest things...
Steve
|
|
ford38v8 |
|
06-22-2016 @ 1:27 PM
|
|
|
|
Senior
Posts: 2739
Joined: Oct 2009
|
Steve, Glad you've got it under c control now! Sounds to me like the vibration -while -driving caused the now older, weaker springs to break contact, and the shrink tubing now allows some improvement there. It might be wise to get some replacement springs at the hardware store for next time!
Alan
|
|
len47merc |
|
06-22-2016 @ 12:32 PM
|
|
|
|
Senior
Posts: 1165
Joined: Oct 2013
|
Ok guys - updating earlier than expected to give the Forum's brains additional time today to chew on this one. Advil'd-up the back and took the '47 out for a 60 mile cruise this morning city and highway with a dozen or so stops. Driver's side brake light working perfectly so far. Stopped in after 20 miles or so of city/country driving to see the wife and bring her lunch at work and brake light was working - longest it has worked in months. Then another 20 miles of city/country, light still working. Then back home city/country still working. First time in many months it was still working when I got home after many 30 min to 2 hour trips, each trip without fail the brake light was working when I left (after removing the bulb, further troubleshooting, tinkering with the contacts and reinserting the bulb) but was not working while on the drive or when I got the car home. The question is - why is it now working after insulating each contact in the socket?
Attached is a pic of the insulating tubing I placed over each contact and spring inside the light socket (it actually is heat shrink insulation tubing that of course was not heated/shrunk on the terminal). Why this (seems so far to have) worked I cannot explain - need a better electrical guru (Tom - you out there?) to 'splain this one. What could be happening with the brake contact on this wire in this receptacle AFTER the light is inserted that: 1) Allows the light to work in the garage but caused the brake light to stop working after a drive of 5-10 miles with associated vibration, 2) Affected only the brake light on the driver's side and not also the driver's side tail light or the passenger side brake light and lastly 3) Apparently was resolved by placing this insulating tubing over each contact - How?
Or do you think the tubing is only a facade and this will rear its head again - not enough wheel time to draw a 'resolved' conclusion? Or that from scr*w*ng with it so much over months I've now created good contact and it is only a coincidence that this happened at the same time the tubing was installed?
Steve
|
|
len47merc |
|
06-22-2016 @ 6:51 AM
|
|
|
|
Senior
Posts: 1165
Joined: Oct 2013
|
No problem cliftford - I did mention that I'd switched bulbs side-to-side with no change. I've also installed a new bulb with the same results but didn't mention that earlier.
Again, if the last effort works with the insulating sleeves I'ma gonna let it ride. If not, Tom's suggestion wrto testing the strength of the connection between the wire and the brass round-head contact for the brake light. Then if nothing there perhaps it's a cold solder joint and I'll try cutting a short section of the wire, re-flowing the solder with new and reattaching the contacts at both the light socket end and the bullet connector end. Last resort I replace the whole kit'n kaboodle ~30" tail light wire harness without ever knowing, other than by deductive reasoning, what the root cause was - which absolutely flies against my grain!
Update hopefully this evening. Oh my achin' back...
Steve
|
|
cliftford |
|
06-22-2016 @ 6:40 AM
|
|
|
|
Senior
Posts: 845
Joined: Jan 2014
|
Steve, I don't mean to insult your inteligence, but i don't see anything in your posts about trying a different bulb. could this be a possibility?
|
|
len47merc |
|
06-22-2016 @ 6:00 AM
|
|
|
|
Senior
Posts: 1165
Joined: Oct 2013
|
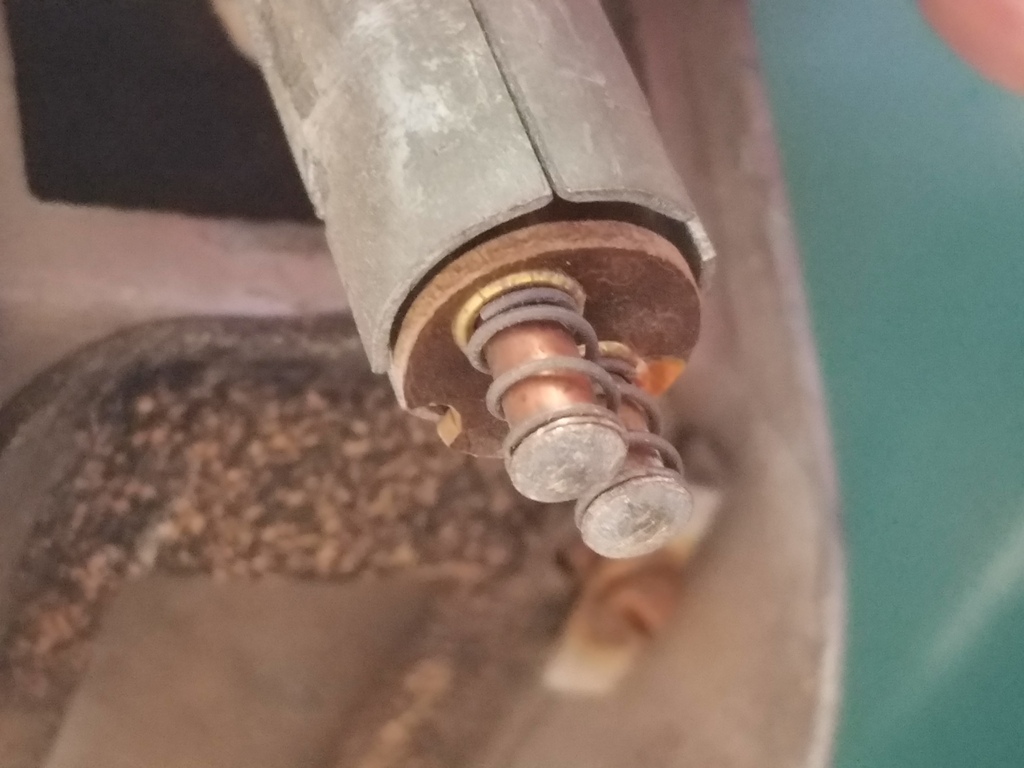
Just to be sure - attached is a pic of the passenger side tail light wire contacts/base for my '47. I assume and believe these are the originals given both the driver and passenger side are identical, the clearly aging patina of both sides are consistent above and below the insulating base and for the length of the wires under the car, the bullet contacts on both sides show the same patina and difficulty in removing as the balance of the car and these are also identical to those I've seen on '46-'48 parts cars I found locally back when I was bringing this car back to life. Greatly appreciate knowing if otherwise.
BTW - this is an old pic taken back when I was going through all grounds and contact points a few years back that shows the contacts as they were found after coming out of their 35-40 year slumber for the first time.
Steve
This message was edited by len47merc on 6-22-16 @ 6:04 AM
|
|
len47merc |
|
06-22-2016 @ 4:14 AM
|
|
|
|
Senior
Posts: 1165
Joined: Oct 2013
|
Sorry I wasn't clear Alan. Mine is the original design and is the original wire and contacts with 2 springs. Sorry I can't help you with your theory here. Other than the coil/generator to VR harness, the battery-to-firewall and firewall-to-manifold ground straps I am running the original wires and harnesses throughout the entire balance of the car.
I have not been able to locate the original design 2 buttons-each-with-a-spring and a brown fiber base plate/insulating disc like mine/the original yet - not sure who might carry them. Keeping an eye on eBay. Hopefully my efforts yesterday will solve the issue and I won't have to look further. Unfortunately if it does solve it I will not know why but fingers crossed on this next-to-last effort (Tom's suggestion my last resort if this cheesy sleeving over each contact and spring proves fruitless).
Apologies for no update last night - tweaked my back tinkerin' with this darn tail light and it kept me prone all evening. Brake light's still workin' in the garage this morning - try to get it out for a drive after the heat of the day subsides and the back quits screaming at me.
Steve
This message was edited by len47merc on 6-22-16 @ 4:45 AM
|
|
ford38v8 |
|
06-21-2016 @ 7:33 PM
|
|
|
|
Senior
Posts: 2739
Joined: Oct 2009
|
Steve, I just went back over your initial posting where you mention the "fiber insulating plate holding the two brass spring loaded buttons". If I understand what you said correctly, I believe what you have is an aftermarket bulb receptacle, having one single spring to press the two brass connectors to contact the bulb. I've always considered these to be a poor design, likely to not make a solid connection. The original Ford part had two separate springs, each pressing only on it's own contact, theoretically less likely to fail. If this is indeed the case, then I've been right all these years and finally have the chance to prove my theory!
Alan
This message was edited by ford38v8 on 6-21-16 @ 7:34 PM
|
|
len47merc |
|
06-21-2016 @ 7:54 AM
|
|
|
|
Senior
Posts: 1165
Joined: Oct 2013
|
Thanks Tom - I'll give your swag a go next. The bullet connections for that short tail/brake light harness seem solid - just checked and cleaned them with emery cloth 20 minutes ago and gave 'em both a good tug and they seem firm. Also cleaned the single female wire connector and all is very snug/tight and clean after reassembly. Main wiring harness end also checked and cleaned and is strong.
Still thinkin' it's gotta be in the spring loaded brass button head connection for the brake light somehow. I didn't check it for tightness just now but did check continuity again and it's there. For my personal SWAG I decided to cut two very short (~3/16"-1/4") pieces of insulating tubing (just large enough to fit over each round-head contact & spring) and place them over the springs and button head connectors to both provide more support for the ends/keep them better aligned and as well ensure no possible shorting between the two and/or the outside of the socket. I know - I know - makes absolutely no sense technically given the other lights' behaviors but I'm pulling at straws here. All lights are again workin' properly now (in the garage) - will take it out this evening for the obligatory 30 minute exhaust system dry out minimum cruise and see if the driver's side only brake light, failure-on-the-road-only phenomenon repeats itself.
Tom, if a no go again with this illogical-but-let's-try-it-anyway insulating tubing step I'll pull it again and check the ends of the light harness inside the socket for firmness as you suggest.
In the end I'm down to replacing the tail light socket wire with a new 29A-13410-LS (have to research a bit further to confirm that part number is correct) but very strongly wish to accurately identify the true source of the problem before spending $'s. It's tough because you cannot see what is happening with the contacts when the bulb is inserted and locked in.
Report back later. Any other thoughts in the interim welcome and thanks to you all who have weighed in so far!
Weird.
Steve
This message was edited by len47merc on 6-21-16 @ 8:05 AM
|
|
TomO |
|
06-21-2016 @ 7:22 AM
|
|
|
|
Senior
Posts: 7244
Joined: Oct 2009
|
Here is my SWAG. The wire may only have a couple of strands making contact. It could be a loose bullet connection, bad crimp or a broken wire.
Check the bullet connector for that light to make sure that the connection is good and that the bullets snap into place.
If that doesn't fix it, remove the wires from the tail light assembly and try pulling the bullet connector off and if that is secure, try pulling off the bulb contact. If both are secure, try installing new wires in the tail light assembly.
Tom
|
 Reply to Discussion
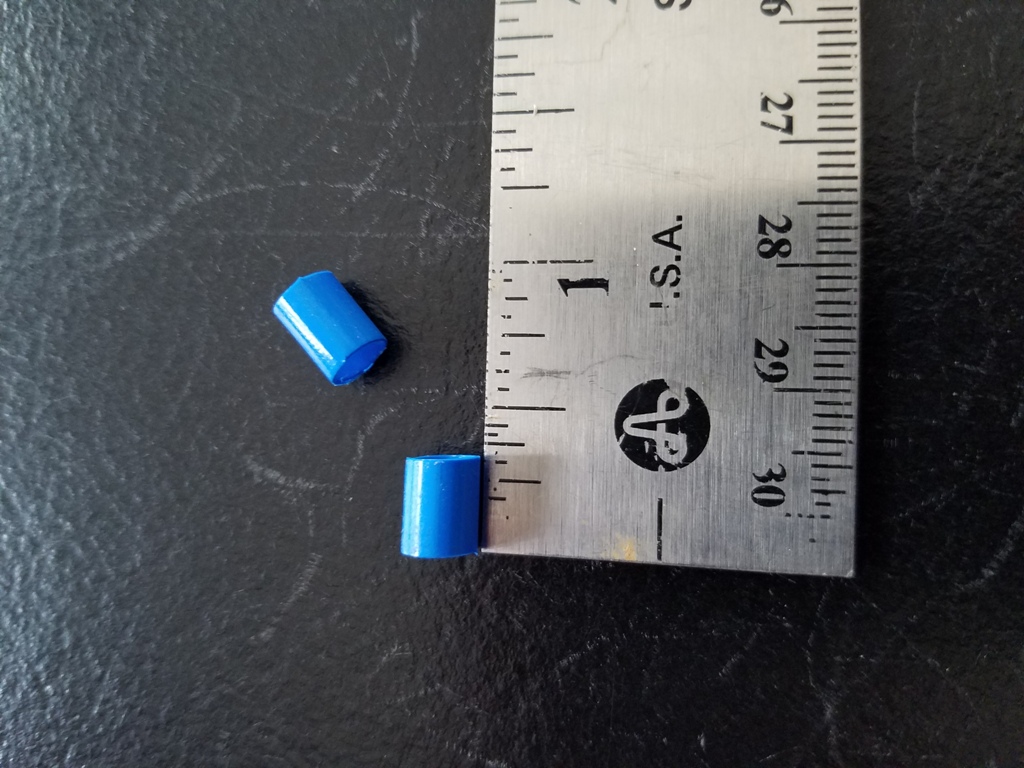